How to Make Large Pixel Art Backgrounds in Unity
In our first 2D Pixel Perfect guide for retro games, nosotros showed yous how to set upward the 2D Pixel Perfect tool and how eight-bit graphics were made dorsum in the day. In this postal service, we fast-forrad to the 16-fleck era. With the help of Mega Cat Studios, you'll learn how to create authentic art for Sega Genesis (or Mega Drive) and Super NES-manner games using Unity settings, graphics structures, and color palettes.
Take your 2D evolution experience to the next level and explore Unity'southward native suite of second tools.


Mega Cat Studios has turned the creation of highly accurate retro games into an art form. So much so, in fact, that several of their titles can also be acquired in cartridge class and played on retro consoles like the Sega Genesis.
Using 2D Pixel Perfect for retro games
Before y'all plunge into this mail service, we recommend you lot familiarize yourself with our previous retro guide, where we covered the 2nd Pixel Perfect settings and how to recreate 8-bit-style graphics. With Unity 2019.2, second Pixel Perfect is now function of the second Renderer, which is in the Lightweight Return Pipeline (LWRP) package. second Pixel Perfect also exists every bit a standalone package (with the same functionality) for creators who don't apply LWRP. For this guide, we'll show you how to set up the project in LWRP.
Setting upwards a new project in Unity 2019.2 and LWRP
- In the Unity Hub, click New, select 2D, so name your project.

ii. To import the 2D Pixel Perfect package, click the Window menu in the toolbar and select Package Manager. In the popular-upward window, select the Lightweight RP package, making sure you get version 6.nine.0 or higher.

3. Adjacent, y'all will configure the 2D Renderer in the Editor and create a new Pipeline Asset. In the Project window, correct-click the Assets view and select Create > Rendering > Lightweight Render Pipeline > Pipeline Asset.
4. In the Assets view of the Project window, create a new 2D Renderer by right-clicking and selecting Create > Rendering > Lightweight Render Pipeline > 2d Renderer.

five. Select the Pipeline Asset you created. Select General, then change the Renderer Type from Forward Renderer to Custom.
6. Assign the 2D Renderer yous created to the data field.

7. In the Graphics settings, prepare your Scriptable Return Pipeline Settings to use the new Pipeline Asset you created.
The 2D Renderer should at present be configured, including the 2D Pixel Perfect Camera.
In Unity 2019.2, second Sprites can have a "Sprite-Lit" textile, which allows them to react to 2D lighting conditions. If yous are not using 2D lights in your projection, make certain you have material that doesn't require 2D Lights to brand the Sprites visible, in which case y'all tin change the material to "Sprites-Default."

Setting upward Pixel Perfect for 16-bit graphic styles
Y'all need to add the Pixel Perfect Camera component to your Primary Camera. We recommend checking Run In Edit Mode.
The Sega Genesis console has a resolution of 320x224 px (or a filigree of 40x28 tiles of 8x8 pixels). That is the NTSC version. The Super NES has a resolution of 256×224 (30x28 tiles of 8x8 pixels) likewise in its NTSC version.
Using a height resolution of 224 px and designing assets with 8 PPU is recommended for both graphic styles.

If you lot need a refresher on what each selection does in the 2d Pixel Perfect Camera component, run into our previous retro game blog post.
Creating authentic Genesis-manner artwork
In this section, we're going to encompass the workflow for creating artwork that mimics the look of different consoles, as we did in our NES weblog post. There are fewer restrictions than in an 8-bit project and more freedom with color, simply the Genesis has its own limitations. We likewise think it'due south important to explain how the original hardware works and so you lot tin apply those limitations to your own retro project.
Palettes and sub-palettes
Making the leap from 8- to 16-fleck consoles gives y'all more options on more than-sophisticated hardware. That said, the fundamentals of doing great NES artwork still utilize. All of the graphics are still stored in 8x8 tiles, for case, so assembled into larger images, whether they're Sprites or groundwork elements. You withal need to piece of work within limited sub-palettes with a common transparent color, although 16 $.25 offers greater freedom in palettes in some ways. You volition probable exist relieved to hear that 16-bit consoles mostly exercise non have a hard-coded color palette similar their 8-bit counterparts, which means the available colors are greatly expanded from the NES.
Next, the Genesis boasts sub-palettes that contain fifteen colors plus the common color used for Sprite transparency and layer transparency. One of the weaknesses of designing art for Genesis comes from the sub-palettes, though. Sub-palettes can be freely assigned to either Sprites or background tiles, but the Genesis simply allows iv sub-palettes to be used at a time. Because of this, artists must exist mindful of which colors are being used in a sub-palette so that they can be maximized for both Sprite and background apply. A sub-palette for the Genesis commonly contains colors that are existence used by both backgrounds and Sprites in order to fit everything in cleanly.


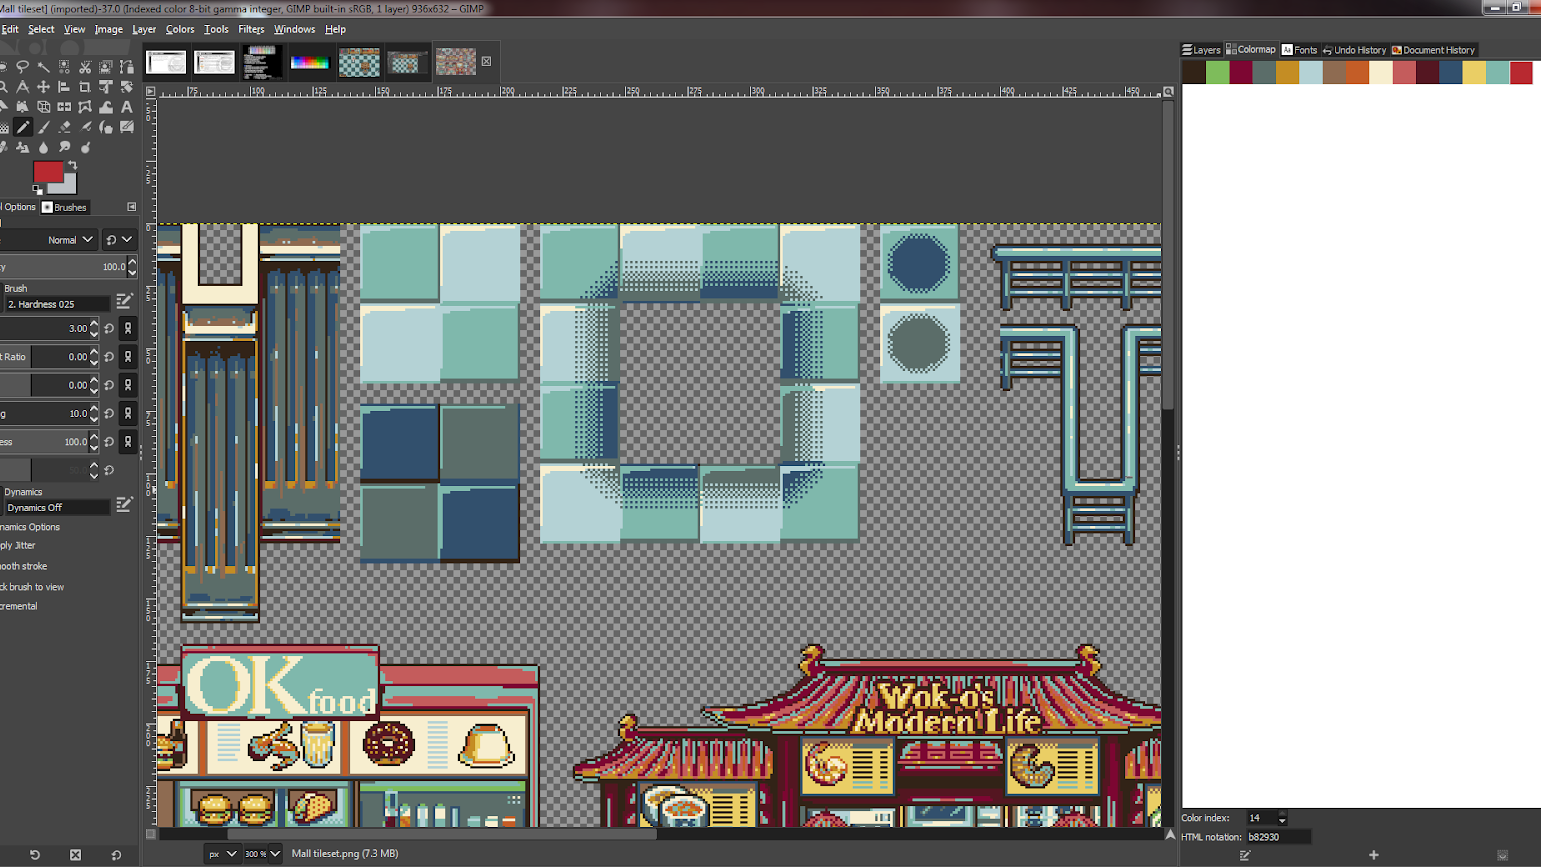
To create for any xvi-bit platform, you lot need to work with an indexed palette. For this, Gimp can be an open-source culling to Photoshop that allows a lot of indexed palette manipulation.
To create the indexed palette in Gimp, get to Epitome > Fashion > Indexed…
The Indexed Color Conversion window appears.

Fix the Maximum number of colors to 15. You can use automatic dithering patterns, just these tend to look better when they're created manually.
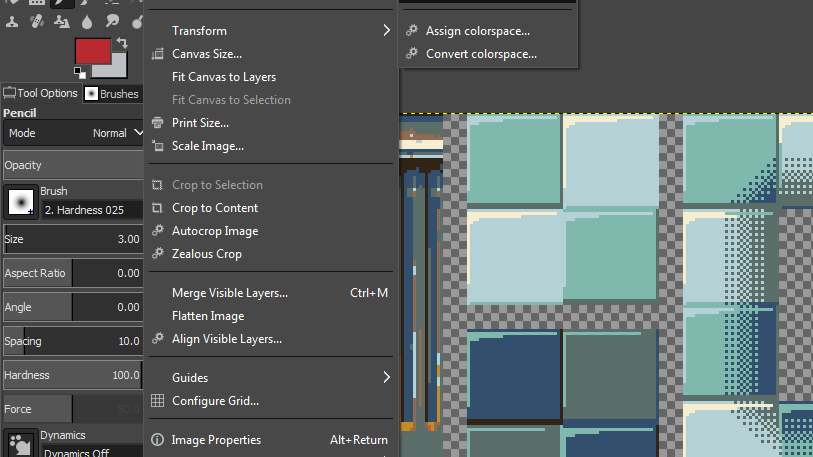
The paradigm's colors are now indexed. This information is automatically saved with the paradigm then that the colour index can exist used. If you need to alter the lodge of the colors in the index, you can simply right-click the colour map and select Rearrange Colormap...

A pop-upwards menu appears, allowing y'all to drag and drop colors into a new guild.

1 popular trick for creating greater color depth is to command the palette forth a specified raster line, much as parallax scrolling was achieved on the NES. The Genesis is capable of irresolute the sub-palette selections for the artwork forth a specified raster line. This trick is oft used to create the illusion that part of a level is underwater. The "underwater" colors are added to a completely dissever sub-palette pick, and the sub-palette choice is loaded once a certain raster line is rendered on-screen.
Tile-based storage and loading on the original hardware
In general, xvi-fleck consoles practise not load graphics tiles in the aforementioned fashion as 8-fleck consoles do. 8-flake consoles will load Sprite and background tiles separately and in large chunks of information to avoid using a lot of processing ability, while 16-bit consoles have the processing power for greater flexibility. They tin load and bandy out individual tiles on the fly, allowing yous to load in only the graphics y'all need when you demand them. This allows a greater range of artwork to be used within a unmarried level or screen of a game.
Another attribute that's unique to the Genesis/Mega Bulldoze is that graphic tile and palette information are not the but things existence loaded into the panel'south VRAM during the game. That can brand designing fine art for the console catchy because the number of graphic tiles that can be loaded into memory at a given time varies depending on what else is going on in the game. More often than not speaking, most games will permit enough space to load in ~g tiles, and if in that location is a dynamic element and then the tiles can always exist swapped in and out freely.

Although a greater range of available tiles can be loaded into VRAM at one time, almost of the time that actress freedom gets reserved for the Sprites, to allow for more varied animations and more types of Sprites on-screen at once. That means the bones design philosophy of using repeating segments of tiles tends to nonetheless be used a lot in 16-bit art then that the background doesn't have upward too much of the available space. The resolutions of the NES, Genesis, and SNES are all pretty similar, then 16x16 segments tend to exist the starting signal for these kinds of designs.

Working with groundwork layers
The Genesis/Mega Drive allows for two background layers to be active at one time on the screen. This means that layered elements are more readily available for designing backgrounds. That said, it's still merely two layers, so the artist and programmer might have to rely on some raster-line tricks in order to create greater depth in a scene. Luckily, because all of those can go onto a second layer, designers are costless to place foreground objects in front of the groundwork without breaking the illusion.
Having a 2nd layer also makes the use of Sprite-priority tricks to create foreground objects obsolete. Instead of having to repeatedly change Sprite priorities on the fly, at present y'all can simply set the 2nd background layer to display in front of the histrion, although more advanced layering might still require quick manipulation of Sprite priorities. The second groundwork pane also features a sub-pane that can be used for heads-up displays (HUDs). The sub-pane will be locked in identify and never gyre.

Sprite limitations
When you lot piece of work with Sprites at that place is greater liberty when making the jump to 16-chip. The Genesis/Mega Drive lets you have 80 Sprites on-screen at a fourth dimension and near 20 on a single horizontal line before it stops rendering any new Sprites. Beyond that, Sprites are no longer counted every bit individual 8x8 tiles. The Genesis is capable of generating single Sprites made of multiple tiles. These can be every bit small as a single tile and equally big as 4x4 tiles in size. Anything larger than that would all the same require making it out of multiple Sprites.

Dithering patterns and contrast
One of the defining features of 16-bit era artwork is the use of dithering. Games back then were displayed on CRT monitors, where pixels on-screen had a trend to drain into one another. Artists would take advantage of this fact by using dithering patterns in the artwork, so when ane pixel bled into some other in a repeating blueprint it created the illusion of having more than colors than were actually bachelor. To this day, dithering is heavily used in pixel art, despite upgrades in our displays, to maintain an accurate aesthetic.

Of the two major sixteen-fleck consoles, the Genesis/Mega Drive displays its colors with much greater contrast. This is likewise something y'all need to be aware of when choosing your sub-palettes. Making something with more muted and dull tones won't end up looking quite how it's expected to when it comes to actually rendering the image on hardware. Art should mostly be created with a high-contrast color palette so the last result will stay in line with the artist'southward original vision.
Creating authentic SNES-style artwork
For Super NES projects, we are still working with 8x8 pixels in size tiles/grid, then working with repeatable tiles is extremely useful. Generally speaking, these will be in some multiple of eight.
Colour palette
The first fundamental difference betwixt the Genesis/Mega Drive and the SNES pertains to the color palette. Much like the Mega Drive, the SNES does not take a hard-coded color palette, so you can choose their colors.
The tricky matter well-nigh the SNES is that it uses 5 bits per pixel (BPP) colors, which aren't very common today. You can address this by using Gimp to create artwork, then you can simply posterize the image to 32 shades of RGB, which volition work out to 5 BPP colors, even if y'all didn't save the image equally such. This allows your image colors to display accurately on the console.

Yous can find this option in Gimp nether Colors > Posterize… A popular-up window appears, where you tin ready the Posterize levels to 32 to create 5 BPP-compatible colors.

Screen-resolution considerations
The adjacent big difference between the two systems pertains to screen resolution. Since SNES is the successor of NES, the ii systems share similar screen resolutions. The internal resolution of the SNES is 256x224. This allows any images that are being rendered to display within the rubber zones of most CRT televisions, so none of the image volition be cut off. This resolution never changes, so this will be the image size an artist volition demand to use as a reference.

Screen modes of the original hardware
This department provides a quick reference to what the various screen modes have to offer.

The most significant deviation between the systems is that the SNES can render groundwork graphics in seven unlike screen modes. The SNES is capable of rendering a total of 256 colors on-screen at once in a single sub-palette in certain screen modes. Here are some of the virtually popular screen modes:
- Style 1: This is ane of the most commonly used screen modes for the SNES. It boasts the best average showing of the console's capabilities. Style 1 allows y'all to have 3 background layers where ii of them have their own 16-color sub-palette, and the final layer has a 4-color sub-palette.
- Fashion 3: This way is generally used for larger static images similar title screens and story screens. Information technology boasts two background planes. The outset uses a full 256-color sub-palette, and the second allows for a 16-color sub-palette.
- Style 7: This was 1 of the main features of the SNES. It was shown off in most of the promotional material for the console, Manner 7 was the offset time that a abode console was able to apply transformations to an prototype in real-time, allowing scaling, rotation, stretching, and skewing in the background plane. This was used to create the pseudo-3D effects seen in a lot of racing and flying games for SNES.
The single background plane in Mode 7 is handled much differently than all other screen modes to allow these features to work. First, there is only a unmarried 256-color groundwork plane to work with, which ways that all Sprites need to share their colors with the sub-palette of the background airplane. Next, instead of working with the normal screen size of the SNES, a Mode seven groundwork aeroplane is 1024x1024 pixels in size. It is and then sized and adjusted to fit the screen still the designer wants.

Sprite sizes
After the complexity of the background screen modes, the rules for Sprites are relatively uncomplicated. The SNES has multiple different Sprite modes, much like the Mega Bulldoze did, simply with the difficult limitation of only existence able to use ii dissimilar Sprite modes for the entirety of the game.
Sprites can be 8x8, 16x16, 32x32 or 64x64. Not only that, but designers must cull from a predetermined listing of Sprite size combinations. Games on the SNES can include the following combinations:
- 8x8, 16x16
- 8x8, 32x32
- 8x8, 64x64
- 16x16, 32x32
- 16x16, 64x64
- 32x32, 64x64
These sizes are "set up in stone" once you choose them, and all Sprites in the game must conform to them. The SNES is capable of rendering 32 Sprites on a unmarried horizontal raster line at a fourth dimension, but boasts a hefty 128 Sprite limit on what can be shown on-screen at a time. Annihilation beyond that volition non be rendered on-screen.

Sprites accept eight sixteen-color sub-palettes to piece of work with. Much like all retro consoles, the first color of whatsoever sub-palette is a common shared color that's used for transparency. The extensive quantity of sub-palettes compared to the other consoles covered gives you greater freedom when choosing colors for Sprites. You merely need to keep in mind that there's a hard 256-color limit.
Next steps
We hope you enjoyed this post on how to create 8- and sixteen-bit retro games using 2D Pixel Perfect in the latest version of Unity.
We're non done with 2D Pixel Perfect yet, every bit the characteristic will be verified for production in Unity 2019.three, and will also be more compatible with Cinemachine 2d.
Let us know how your own second Pixel Perfect project goes, and don't forget to visit the 2D forum to engage with the Unity community and 2D development team.
Source: https://blog.unity.com/technology/2d-pixel-perfect-how-to-set-up-your-unity-project-for-retro-16-bit-games
0 Response to "How to Make Large Pixel Art Backgrounds in Unity"
Enviar um comentário